How do you select a machine embroidery stabilizer when there are so many choices? It can be quite challenging. And since there are so many choices, there may be more than one right answer. Let’s start by asking a few questions that will help you pare down the selection to find the best embroidery stabilizer for your project.
 1. Will the wrong side of the embroidery be visible?
If so, a tear-away or completely removable stabilizer would be the first choice.
2. Is a permanent stabilizer required? And why would it need to be permanent?
All knits and heavily laundered items such as uniforms and athletic wear require a stabilizer that remains in the design to maintain the crispness of a design’s details. A permanent stabilizer also helps retain the design’s shape after repeated use and washings.
3. Is the fabric sheer?
Embroidering on tulle, organdy, netting and other sheer fabrics call for a completely removable stabilizer.
|
4. Is the fabric translucent such as light-colored knits and wovens?
Stabilizer bleed-through is a fashion no-no! Choose a tear-away or light cut-away such as poly-mesh to avoid that halo effect.
|
 |

|

5. Can the fabric withstand water or heat applications?
Velvet, silks and other delicate fabrics require special attention.
6. Will tearing the excess stabilizer distort the fabric or embroidery design?
Some delicate fabrics can be damaged by ripping off the stabilizer. Also, the delicate outlines of some embroidery designs can be pulled out of shape by the violent act of tearing. Check the tear-away product itself. Does it tear easily and cleanly in both directions?

 7. Is the item a wearable?
The stabilizer should provide a foundation for the embroidery without changing the drape of the fabric.
8. Is this a multiple-item project (or large production run)?
Tear-away tends to save time on repeat applications.
9. What is the stitch count of the embroidery design?
Light and airy designs can be produced with high definition with a minimum of stabilizer while large fill designs require a stronger foundation.
10. Can the item fit in a hoop?
Hooping ensures the best stabilization for any fabric. Difficult or impossible to hoop items require an adhesive backing.
|
11. Does the fabric have a pile and will the application of an adhesive pull on the pile or loops?
Lofty fabrics call for a topper (usually water soluble film) to tame the nap so the stitches do not sink into the fabric. Adhesive stabilizers used as backing on pile fabrics can pull the fibers upon release. Protect the fabric with a fusible, light tear-away between the item and the sticky stabilizer.
|

|
 |
There are so many variables in the machine embroidery process that a test should be conducted for every fabric, design and stabilizer. Let’s look at some of the variables: stability of the fabric, color of the fabric, design stitch count, thread, needle, machine speed, stitch length, hooping technique, needle tension and bobbin tension.
Use the questionnaire above to guide you in your initial selection of a stabilizer and then test the fabric/design/stabilizer combo. If you’re satisfied with your initial selection, go with it. If not, change one variable and test again. Keep your samples, they’ll show the result of each adjustment you make. Write the results on an index card and staple it to the sample. If you don’t have extra fabric from the project, purchase a 1/4 yd. of similar fabric or go to a second hand clothing store and buy a duplicate article. Once you’re satisfied with your results, make a note of it! You’ll be so glad you did when you attempt the same project at a later date.
 Cut-away Cut-away
Best for knits and loosely woven fabrics. A permanent stabilizer, cut-away is trimmed to within a 1/4” from the design edge. It comes in a variety of weights - from lightweight (but strong) polymesh to heavy. Select a weight that will support the design without changing the hand of the fabric. Cut-away should not be visible from the right side of the embroidery. Polymesh cut-away is available in black, white and beige while many other cut-aways are available in white and black. Many cut-aways are fusible products and if not, they work very well with temporary spray adhesive.
|
Tear-away

Best for woven fabrics, tear-away stabilizer should be easy to remove. Just pull on the excess stabilizer and the needle perforations from the embroidery will help release the excess. Tear-away should tear in both directions. When selecting a tear-away, give it a pull in both directions. Tear-away remains in the design, providing a foundation for the embroidery throughout the life of the item. Tear-away should only be used on designs and fabrics that can withstand the violent act of tearing the excess. It’s difficult to remove tear-away from small open areas within a design.
Use it with medallion-type designs. Delicate fabrics and light, airy designs are not good candidates for tear-away.
Although many embroiderers insist on using only one layer of stabilizer, I find two layers of a light tear-away are easier to remove than one layer of heavy tear-away. This is a matter of personal preference - see what works best for you.
|
 Wash-away Wash-away
Can be used as both a backing and topper. It is available in many forms today, plastic film, paper, liquid and woven. Regardless of its form, all wash-aways are completely removable when wetted. The number one factor in deciding whether or not to use a wash-away is can the fabric get wet. And not only can it get wet but do you have the time to wet and dry the fabric.
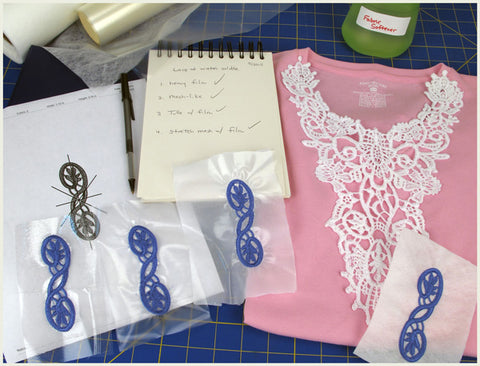
Wash away film comes in a variety of weights - light is excellent as a topper - and heavy - the best foundation for lace, edging and cutwork. Read the manufacturer’s directions for removal - they are DIFFERENT. Some call for hot (watch out for fabric shrinkage), cool or tepid water.
When used as a topper, lightweight wash-away can be gently torn away from the embroidery. Small patches can be removed with a dampened cotton swab or toothbrush.
Wash-away stabilizers are also used for embroidered lace as shown below.
|
 Heat-away Heat-away
Best for non-washable fabrics, sheer fabrics, and fabrics too delicate for a tear-away. Heat-away stabilizers come in two forms: film and woven. They are completely removable when applied in the correct manner. The film version of heat-away is removed with a dry iron and is often used as a topper. The woven version is great for lace making or creating fabric with thread. It will crumble when heated with a dry iron. Follow the manufacturer’s directions for best results.
|
The beginning embroiderer should have:
- lightweight wash-away
- lightweight cut-away in beige
- heavy cut-away in white
- lightweight tear-away
- lightweight fusible tear-away in white
- temporary spray adhesive
The well-stocked embroiderer should have all of the previously mentioned embroidery stabilizers plus the following:
- heavy wash-away
- colored tear-away topper
- lightweight cut-away in black
- heat-away
- heavy cut-away in black
- lightweight fusible tear-away in black
You might also be wondering what the difference is between stabilizer and interfacing. Interfacing is backing that is added to the fabric for stability and it isn't removed while stabilizer is removed when the project is finished.
We hope you have found this information helpful in your quest for the perfect embroidery stabilizer. Be sure and visit Eileen Roche's Machine Embroidery Blog for more helpful tips and techniques for your embroidery.
 1. Will the wrong side of the embroidery be visible?

 7. Is the item a wearable?
 Cut-away
 Wash-away
 Heat-away